Gather a few things See what you’ll need
- Thin paper for a practice wrap
- Scrap page matching the journal paper
- Ruler and scissors
- Silicone-coated release paper
- Thin adhesive
- One small test insert for each face
Choose an exercise 4 things to try as you read
Choose an outer edge with room to move
Use the outer page edge, away from the spine. Start on a scrap sheet of similar weight so you can learn how the paper and adhesive behave before covering a real entry. Avoid a brittle, wrinkled or overloaded page, or one with writing where the wrap will sit.
Try folding an offcut before you cut the full strip. Thin patterned paper or a light book-page print can bend around the edge more readily than chipboard or a laminated scrap. If the offcut cracks or springs open, choose softer paper; extra adhesive would stiffen the very turn that needs to move.
ONE WORKED EXAMPLE
A wide front with a quiet reverse
You want a place for one light tag near the outer edge of a journal page. You begin on similar scrap paper rather than covering an entry.
Before
Folding the strip into equal faces would use more of the front area and invite a second insert before you know how the page turns.
After
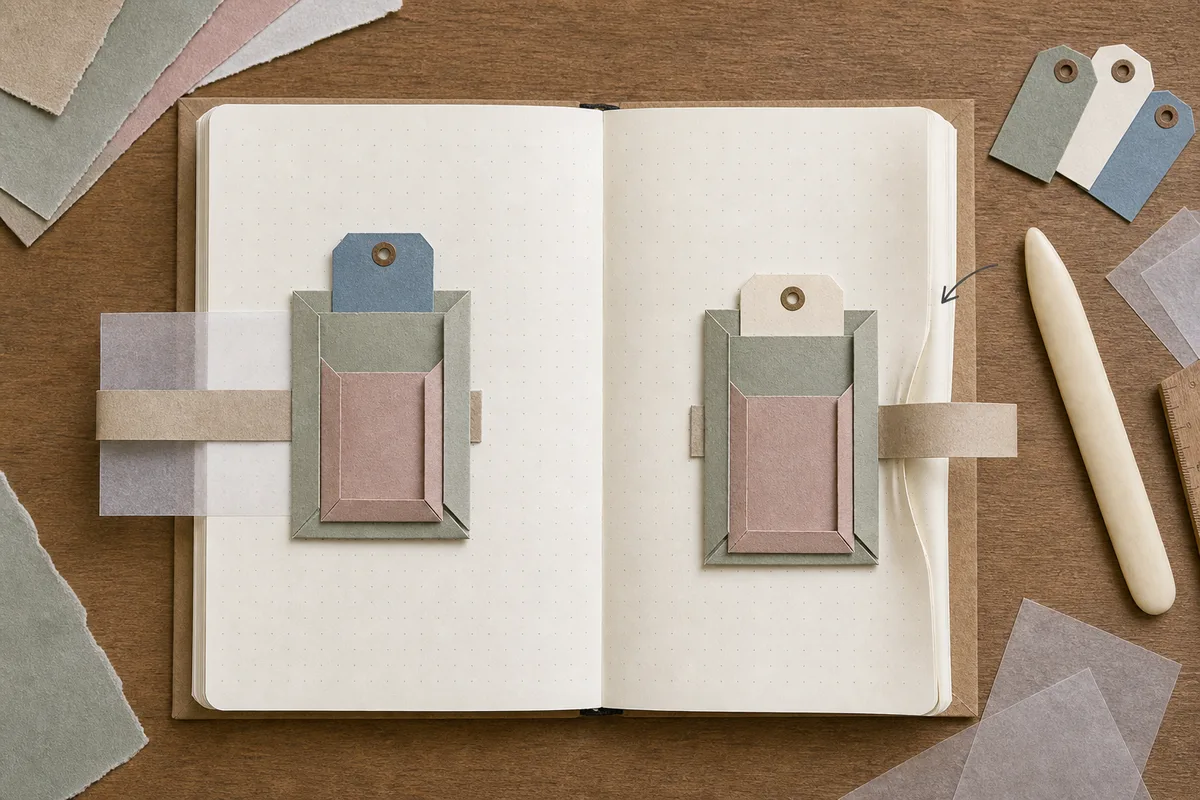
A 3 × 5-inch strip folds loosely around the edge with a ½–⅝-inch return behind. The broad front has only its bottom and outer stop attached. After drying, the tag pulls inward; the narrow reverse stays unused while the empty page turns easily.
What changed—and what to check
The unequal wrap gives the front enough room without requiring matching storage behind it. Testing one face shows whether the page wants any more weight.
Try this check. Remove the tag, turn the empty sheet, and check that the fold neither grips the edge nor catches the cover.
Something for a future page?
The Washi Tape ShopAffiliate links: we may earn a commission if you buy through these links.
Try a short wrap before a tall one
For a first sample, use a strip 3 inches wide by 5 inches tall. Fold about 1/2 to 5/8 inch of its width around the outer edge to the back. This leaves a broad front and a much narrower reverse; choose a tiny label for the back rather than expecting matching storage on both faces.
A shorter sample is enough to learn the fit. On an 8-inch-tall page, a 3 × 4-inch practice strip works well. Let the fold sit loosely around the sheet rather than pinching it. Close the journal while the wrap is still unglued and trim any overhang so it stays inside the cover.
See the differenceThe back return is much narrower than the front
The back return is much narrower than the front
Compare the broad front with the narrow reverse from the same folded strip.
Read the words in this example
Broad front face
- front
- tag
Broad front face
The 3-inch-wide sample wraps only ½–⅝ inch around the edge, leaving most of its width as the front tuck.
“Use the outer page edge, away from the spine.”
Make the front opening face inward
Think about how you'll pull out the front tag: it should slide toward the center of the page, away from the wrapped edge. Leave that inner side open. Adhesive goes along the bottom and the outer vertical stop on the flat face, immediately beside—but never inside—the fold that crosses the page edge.
Put silicone-coated release paper behind the working flap and between the worked page and its neighboring sheets. The barriers protect the intended opening and surrounding pages from squeeze-out. Apply only a controlled line of glue or narrow tape, then press the glued edges through clean scrap without dragging across the fold.
Try the exampleLeave the front tag’s inward route open
Leave the front tag’s inward route open
Toggle only the bottom and outer stop on this front-face model.
Read the words in this example
- Front attachment
- Insert
- Paper front
- Attached
- Free edge
Corner tuck: 2 attached edges.
Two adjoining edges are attached: right and bottom. The other two edges remain free, making a tuck at the attached corner. Try front tag in the actual tuck before relying on it to hold. This models only the broad front flap against a right-hand page face. Its right bond is a stop on flat paper immediately beside the outer fold, never glue inside the turning fold itself. The tag pulls inward to the left; this is not a diagram of the full two-sided wrap.
- Attachment
- Corner tuck
- Attached edges
- Right, Bottom
- Open edges
- Left, Top
Try one face before adding the other
Let the adhesive dry or cure as directed, remove the release paper, and slide in one light test tag. Pull it inward again. The fold around the edge should stay relaxed rather than moving with the tag or tightening against the page.
Take the tag out and close the book. Reopen it and turn the empty page several times. If the edge curls, catches the cover or feels stiff, keep the reverse unused. That little unfilled fold still connects the two faces visually without asking the sheet to hold more.
GO A LITTLE FURTHERAdd the back only if it helps
Add the back only if it helps
If the front works comfortably, turn the page and reconsider “inward” from this face. The back label also needs to pull toward the center you can now see. Protect with fresh release paper and attach only the bottom and outer stop, mirroring the front. Keep the folded turn dry; do not copy the opening’s left/right appearance without turning the sheet.
After everything dries, try the empty page, then one thin insert per face. Close, reopen and turn it normally. A narrow back return may suit only a small label or page cue. If two inserts make the sheet curl, remove the back one rather than trying to balance it with extra decoration.
Try a what-ifThe reverse label is being pulled the wrong way
The reverse label is being pulled the wrong way
Turn the sheet before deciding which opening is inward.
The front tag pulls toward the page center. After turning the page, you repeat the same left/right pulling direction with the back label and meet the outer stop.
Compare the three choices
What should you check before changing the attachment?
- Trim the label narrower to reduce resistance
Size could be a separate issue, but trimming will not create an exit through an attached stop. Identify the free route first.
- Find the inward opening from the face now in view and try that route
The two faces mirror one another. “Toward the page center” stays useful while a fixed left/right direction does not.
- Loosen the outer stop so the label can exit either way
That stop helps retain the label and lies beside the wrapped edge. First check whether you are pulling toward the intended opening.
Describe the opening from the page face you are using.
What would you try?
Choose an option to see what it would do. You can explore all three.
Leave the edge easy to touch
Keep decoration away from the folded turn, the openings and the cover line. If a loose practice wrap catches the cover, shorten it and round a protruding corner on the desk. Don't make corrective cuts against a bound page.
If glue has bonded the wrong layers, stop pulling. A valuable journal sheet is a poor place to experiment with separating an unknown bond. Remake a replaceable practice piece and leave the valuable page alone. Move the keepsake to a floating pocket or belly band if needed; the folded edge does not have to become storage.
Try the exampleCount what meets around this handled edge
Count what meets around this handled edge
Change the local layer count, then compare a facing stack at the same position.
Read the words in this example
- Position on facing pages
- 3
- Left page
- Right page
- Spine
- Nominal section
- Gold: left page
- No facing stack
- 0.6 mm added
3 layers add a nominal 0.6 mm at the outer edge.
3 × 0.2 mm = 0.6 mm for one stack.Changing the position moves the addition but does not change this arithmetic. A matching stack on the facing page would double the nominal addition at that position. The section adds only the selected paper layers at a fixed drawing scale of 10 pixels per millimeter; page stock, glue and fasteners are excluded. Real compression, binding and closure vary, so test the assembled journal without treating this total as a safe limit. The folded wrap, page, and inserts occupy different local zones on its two faces. Count the layers that actually meet at the spot you are checking; this arithmetic does not simulate the loose fold or guarantee a comfortable page turn.
- One stack
- 0.6 mm
- Added layers at this position
- 3
- Nominal combined addition
- 0.6 mm
- Position
- Outer edge
Where this idea began
Douglas G. Pratt's notebook-pocket tutorial supports placing storage where it is easier to reach—and his warning that several pockets can make notebook thickness get out of hand.
Want to explore the techniques a little further? Here are the maker tutorials and references behind this guide.
- Construction referenceDouglas G. Pratt: Add Storage Pockets to Your Notebook
Douglas G. Pratt’s notebook pocket example informs reachability and the warning about accumulated thickness.