Gather a few things See what you’ll need
- Reinforced paper or light cardstock
- The cards or notes you want to hold
- Silicone-coated release paper
- Ruler and scissors
- Thin adhesive
- Clean scrap for pressing
Choose an exercise 4 things to try as you read
Start with what you want to keep
Gather the usual contents together: a card and folded note, or one small envelope. Use the thickest combination you normally expect, since fitting one sheet can leave too little room for the folded letter later.
Keep the bundle light. Several thick cards may need a pocket with depth instead. If the bundle includes an envelope, cross its body and leave its opening flap free.
Compare the optionsFit the band around the bundle you will actually keep
Fit the band around the bundle you will actually keep
Choose your everyday contents and identify what the strip needs to cross.
Read the words in this example
- folded note
- card
- band
Use a dummy matching the complete bundle.
A band fitted around one sheet may squeeze the folded note you add later. Put the normal combination together, wrap the dummy in release paper, and let the strip rise naturally over it. Keep the total load light and test both sliding directions before decorating.
ONE WORKED EXAMPLE
A folded letter needs more room
You want a horizontal band to hold a postcard and a folded letter together. The first strip was fitted over the postcard alone on a flat practice page.
Before
The empty band lies neatly against the paper, but the added letter bows the postcard when you try to remove the bundle.
After
A new strip rests without tension over a release-paper-wrapped dummy of both pieces. Only the end tabs are attached. The spacer is carefully withdrawn before wet glue hardens around it, and the ends finish drying before the real bundle is tested.
What changed—and what to check
Fitting the full everyday thickness gives the channel room to work; pressing only the ends preserves that space during attachment.
Try this check. Slide both pieces through together without bowing them, then close the loaded journal gently and inspect the facing page.
Something for a future page?
The Washi Tape ShopAffiliate links: we may earn a commission if you buy through these links.
Give the ends enough room
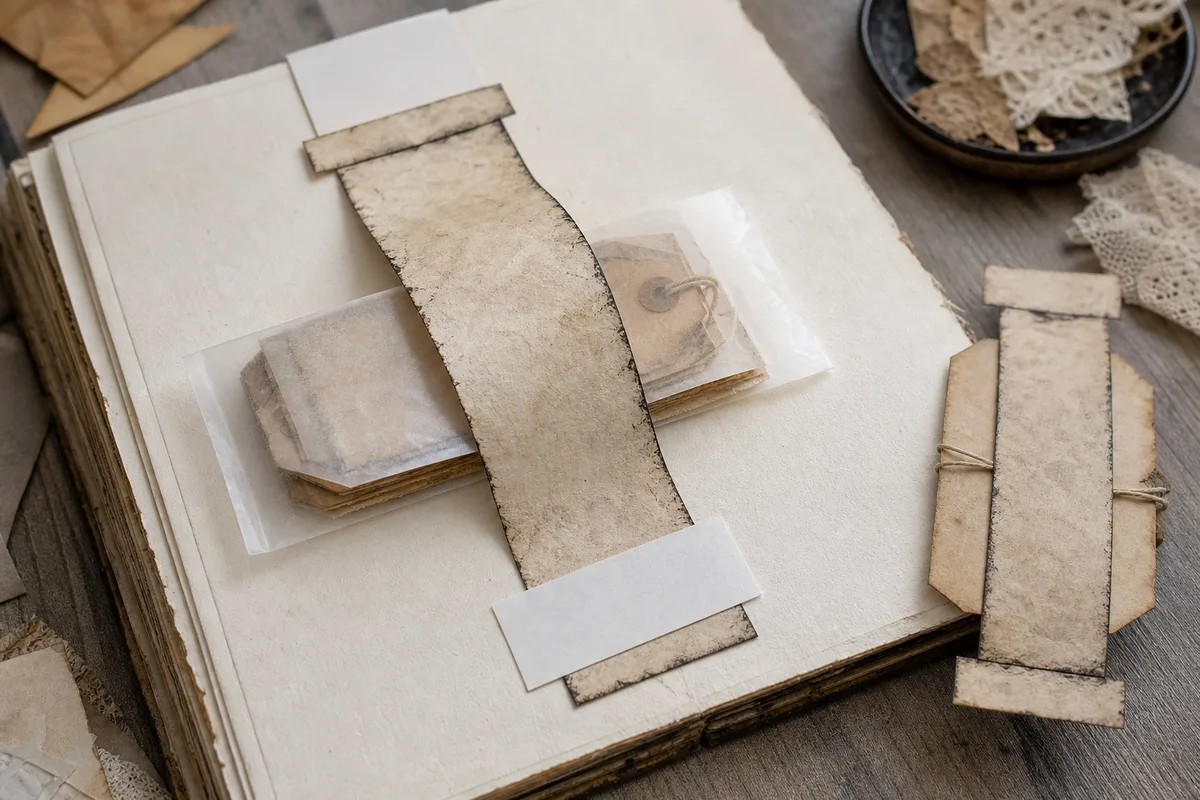
Try a strip 1.25 × 5.5 inches for your first version. Band widths of 1 to 1.75 inches are useful starting points: an extremely narrow strip can crease a soft insert. Reinforced scrapbook paper, a folded book-page print or thin paper-backed fabric can all become a band.
Mark a 5/8-inch tab at each end. Those are the only glued areas. Allow at least 1/2 inch of contact per end, and more if the surface or load needs it. The remaining span must cross the contents without tension. If you have to stretch the strip to reach its marks, cut it longer.
Fit the band around a temporary spacer
Wrap a dummy bundle matching the contents in silicone-coated release paper and lay it on a practice page. Rest the band over the thickness without pulling it tight; the middle needs to rise naturally.
Try the direction you will use. A vertical band attaches at top and bottom; a horizontal one at left and right. Keep a graspable edge visible, and feel the underside of a pieced strip for seams that could catch a passing card.
Try the exampleTurn the band to match the way the card slides
Turn the band to match the way the card slides
Change from left and right attachments to top and bottom. Follow the open middle.
Read the words in this example
- Front attachment
- Insert
- Paper front
- Attached
- Free edge
Paper band: 2 attached edges.
The two attached edges are opposite each other. The top and bottom edges remain open, so usual bundle can pass under the band; there is no attached stop at either of those openings. This models the band-to-page interface only. Left and right ends form a horizontal band with upward/downward travel; top and bottom ends form a vertical band with sideways travel. Fit the span over real thickness rather than pressing it flat.
- Attachment
- Paper band
- Attached edges
- Left, Right
- Open edges
- Top, Bottom
Glue the ends and leave the middle alone
Put strong dry adhesive or a restrained line of glue inside the marked end tabs. The center stays completely dry. Press the ends through a clean scrap while the wrapped bundle supports the middle; pressing the whole strip flat would remove the space you just made.
Once the ends hold their position, carefully slide out the wrapped spacer before wet glue hardens around it. Then let the ends finish drying with the space underneath empty. A brad, seal or glue dot through the center would block the contents, so save decoration for the band face after it works.
Put the steps in orderKeep the space you made under the band
Keep the space you made under the band
Reorder the spacer and bonding steps so the middle remains usable.
One workable order
- Wrap the matching dummy in release paperThe spacer must represent the usual contents while resisting stray adhesive.
- Rest the strip over it without tensionThe ends need enough length to reach their contact areas naturally.
- Bond only the marked end tabsPress the ends through scrap while the spacer supports the unglued middle.
- Slide the wrapped spacer out once the ends holdRemove it before wet glue hardens around it; do not leave the real contents in its place.
- Let the ends finish drying, then test the contentsA dry trial reveals the usable channel without sticking the note to the seam.
Which check needs to come first?
The example shows one workable order. The source starts with ⅝-inch end tabs and at least ½ inch of contact per end. Cut a longer strip if it has to stretch to reach its marks.
Try it with the book closed
Slide the planned contents underneath from both directions. They should move without bowing, with enough of an edge visible for your fingers. Close the journal gently and reopen it. Check the facing page for a hard ridge, then stand the page upright and give it one light tap.
If a narrow card wanders sideways, a small stop tab beside the band may help. Keep that tab outside the middle opening. If the whole bundle slips, changes the page shape or makes the book gape, reduce the contents or choose a pocket instead.
GO A LITTLE FURTHERFix the part that is actually troublesome
Fix the part that is actually troublesome
If removal bends the card, rebuild with a slightly longer strip or a spacer matching the full bundle. If only one end peels, a narrow paper patch can extend that end’s contact without gluing the open middle.
Pause if the spacer sticks. Pulling harder can stretch the band or tear the page; a fresh loose practice version is a better place to resolve the fit. Add a thin label only after the real insert slides and the loaded book closes comfortably.
A bundle that needs enclosed depth may fit better in a gusseted pocket.
Try a what-ifWhat should the position allow?
What should the position allow?
A secure hold should leave the envelope’s closure usable.
A light envelope stays securely under the band, but the band crosses its opening flap. You want to read the letter while leaving the envelope held on the page.
Compare the three choices
What should the position allow?
- Move the band across the envelope body
The body can remain held while the closure opens. Retest the loaded envelope because its position has changed.
- Add another band across the flap
A second hold may increase security, but would further restrict the opening you want to use.
- Remove the envelope whenever you open it
That is a possible routine, but it does not meet this page’s aim of reading the letter while the envelope body stays held.
Fit the hold to the part that stays still and leave the part you use free to move.
What would you try?
Choose an option to see what it would do. You can explore all three.
Where this idea began
These references informed the scrap-built band, end-tab restraint, and release-paper spacer.
Want to explore the techniques a little further? Here are the maker tutorials and references behind this guide.
- Construction referenceLinda Israel: Scrapy Belly Band and Junk Journal Page Tutorial
Linda Israel’s scrap-built belly band informs the band, end restraints, and spacer choices.