Gather a few things See what you’ll need
- An ordinary dark pen
- Your journal
- Scrap paper
Choose an exercise 3 things to try as you read
Find a place where a plant would feel welcome
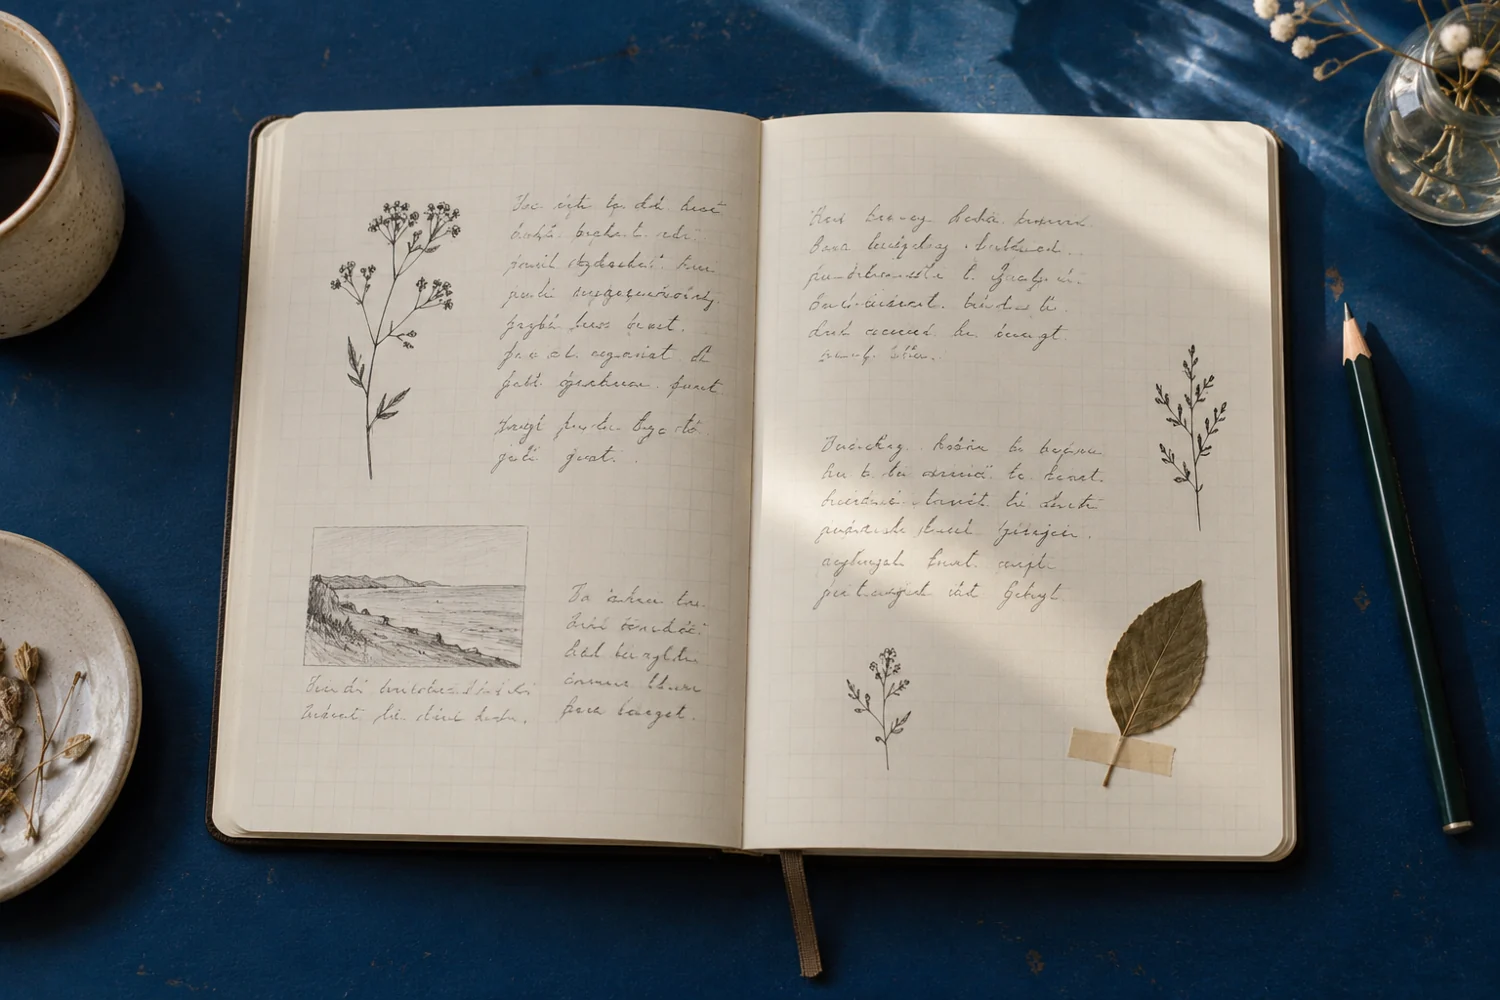
Write the note first, then look at its edges. A short gratitude sentence might have room for a sprig at the end. A narrow outer margin could hold a taller stem. A date near the top of a spring page might suit a tulip.
Choose a gap that already exists rather than tightening your handwriting to make one. Hold the practice scrap beside the note: if the leaves cover letters, try the outside margin or a smaller sprig. Let a larger flower wait for a page where its petals have room.
Try the exampleWhich plant fits the space you already have?
Which plant fits the space you already have?
Switch between a small sprig, taller lavender, and a daisy. Change the footprint and side without giving away the writing area.
Read the words in this example
- A drawing beside words
- Your words
- Separate drawing and writing areas
- Dashed box shows the drawing footprint.
The drawing footprint stays clear of the reserved writing area.
The longer side of “Two-Leaf Sprig” uses 34% of the inner page width; its proportions stay intact. The reserved area still contains four sample writing rules. The dashed footprint includes empty space around the strokes; it flags layout overlap, not an exact ink collision or handwritten capacity. Choose existing open paper after writing the note. A tall stem suits a margin; a small sprig can finish a short line, with its leaves angled away from letters.
- Drawing, longer side
- 34%
- Drawing footprint width
- 27.4%
- Gap across inner page
- 13.9%
- Reserved sample rules
- 4
ONE WORKED EXAMPLE
One sprig after the walk
You have written a short note about an evening walk. The sentence ends before the outer margin, leaving a small open place for a plant.
Before
A tall flower sketch pushes into the final words. Moving the sentence would make the handwriting tighter than the rest of the page.
After
A two-leaf sprig sits at the sentence’s open end, leaning toward the outside margin. The note says, “The lane smelled of wet leaves after dinner.” The stem and both leaves remain separate from the handwriting.
What changed—and what to check
The plant uses space the writing already left. Its placement gives the note a companion without asking the sentence to shrink.
Try this check. Read the complete line once and check that the plant stays outside the letter shapes.
Begin with the shape you can already imagine drawing
The twelve examples below range from a two-leaf sprig to berries, lavender, a mushroom, and an acorn. For a first try, look at the finished silhouettes. Choose one whose main parts you can name: stem and two leaves, perhaps, or cap and stalk.
Press Draw it and watch those parts appear in order. Pause after the stem, then copy the next leaf. You can use the step controls if a curve moves faster than your hand wants to. Try a generous practice size around 35–45 mm before fitting the drawing beside your notes.
“Write the note first, then look at its edges.”
Give each leaf enough paper inside it
A leaf that looked open on the practice scrap can become a dark sliver when you shrink it. Your pen line has stayed the same width. Sweep one broad curve out from the stem and bring the second back, leaving visible paper between them; skip the vein if that small center cannot hold another line.
Keep neighboring leaves apart where you can. Their slight differences can make the stem feel natural, so you don’t need to match every angle. If you’re drawing berries or petals, imagine where the next one will sit before closing the current shape. A little breathing room makes the silhouette easier to read.
Let the note give the drawing a reason to be there
A daisy can mark one cheerful line in a list. Berries can accompany a seasonal market note. A mushroom can sit beside your description of something you noticed on a walk. Write the detail you want to keep, even when the little drawing seems to say it already.
For a longer reflection, try one stem at the outside edge and leave the opposite side open. If you’re using a plant beside a heading, angle it away from the letters. You can repeat that small placement on another page without making every entry follow the same layout.
Write your versionLet the plant point to something you noticed
Let the plant point to something you noticed
Keep the detail that belongs to this entry. Replace the sample with what you saw and where it caught your attention.
Red berries along the lane
On the walk home after lunch
One branch was still wet from the rain.
Your words have a place now.
The drawing need not identify a species. The written observation keeps the particular thing you want to remember.
- Words on this card
- 19
Give the next leaf a better chance
If a leaf comes out too thin, you don’t need to keep drawing around it until it becomes thick. Let it stay and make the next leaf broader. If two berries meet, space the third farther away. You can often restore the overall shape without repairing the original stroke.
For a curl that starts closing up, stop early. For a stem drifting into the writing, send the next leaf outward and finish the plant there. Then look at it from normal reading distance. A recognizable little plant can carry plenty of charm without a perfectly tidy outline.
Try a what-ifThe small version has turned dark
The small version has turned dark
Look at what changed between the scrap and the page.
A 40 mm sprig looks open on scrap. At 20 mm, the same pen makes the leaf veins run into their outlines.
Compare the three choices
What is the most useful next trial?
- Leave out the veins in the small version
The pen stroke did not shrink with the drawing. Fewer interior lines can keep the small leaves open; a slightly larger sprig is another option.
- Use shorter stems but keep every leaf detail
A shorter stem saves height, but does not create space between the veins and outlines inside each leaf.
- Retrace the outer edges for a clearer silhouette
Retracing can make the boundary stronger, but it also uses more of the already crowded white center.
When a drawing shrinks, simplify the details that no longer have room.
What would you try?
Choose an option to see what it would do. You can explore all three.
GO A LITTLE FURTHERLet one plant become easy through use
Let one plant become easy through use
Choose a favorite and draw it beside a few real entries over the next several days, whenever you feel like it. Repeating the complete little plant helps you remember how the pieces fit together. You can let its size and lean change with the space you have.
Keep the practice sprig on a small scrap inside the back cover, with a note about the size that suited your pen. Next time a margin needs a taller shape, compare it with the lavender example. You now have a useful reference to borrow from, without having to remember every curve.
Pick a drawing and follow along
Choose a drawing below. Watch the whole shape appear, or tap a numbered step to see just that part. The faint outline is there if you’d like a little guidance.
Pick a drawing. We’ll take it one stroke at a time.
Two-Leaf Sprig
Two pointed leaves open from a gently bending stem.
The finished drawing. Watch it once, then try one step at a time.
Let’s draw it together.
Give it a place.Tuck it beside a date or a sentence you want to remember.
If the line wandersMake each leaf broad in the middle and bring both edges back to the same stem point.
Spot the mistake and try the repair
Bring both leaf edges to the stem
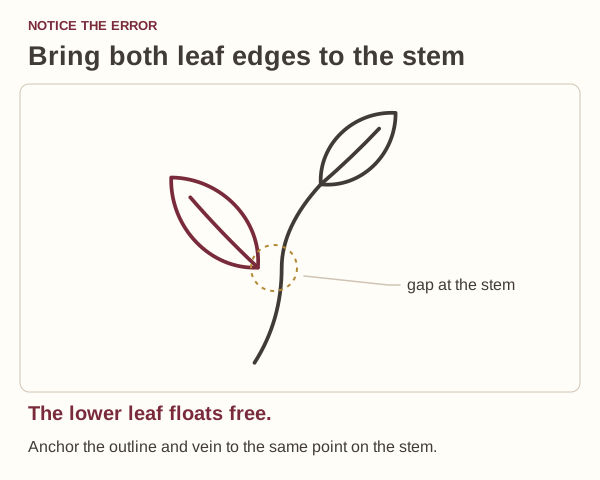
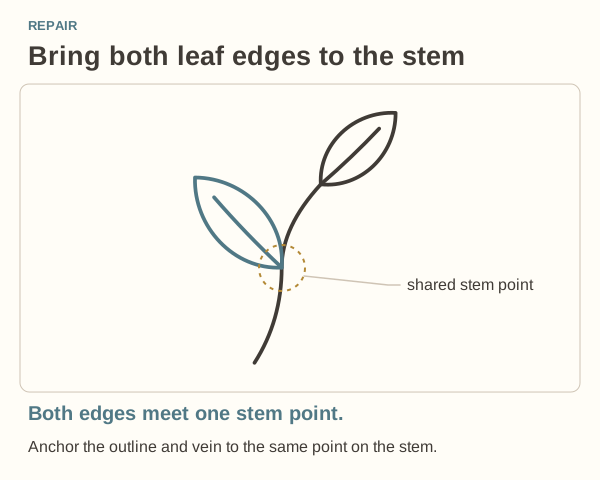
Pick one point on the stem. Start and finish both leaf edges at that same point; let the vein meet it too.
Paired-Leaf Stem
Three pairs of pointed leaves taper toward a slender growing tip.
The finished drawing. Watch it once, then try one step at a time.
Let’s draw it together.
Give it a place.Let it sit in a wide margin beside a quiet paragraph.
If the line wandersKeep the upper leaves smaller so the stem feels like it is growing upward.
Eucalyptus Trio
Three rounded eucalyptus leaves step along a loose diagonal branch.
The finished drawing. Watch it once, then try one step at a time.
Let’s draw it together.
Give it a place.Use it between two sections of a nature or gratitude entry.
If the line wandersLeave the two side leaves a short visible stalk, and let the top leaf finish the branch.
Fern Curl
A fern frond narrows through four leaf pairs into an open fiddlehead curl.
The finished drawing. Watch it once, then try one step at a time.
Let’s draw it together.
Give it a place.Draw it next to a trail note or a plant you noticed on a walk.
If the line wandersKeep the little leaves away from the curl; the blank gap makes the unfurling tip readable.
Spot the mistake and try the repair
Give the curl breathing room
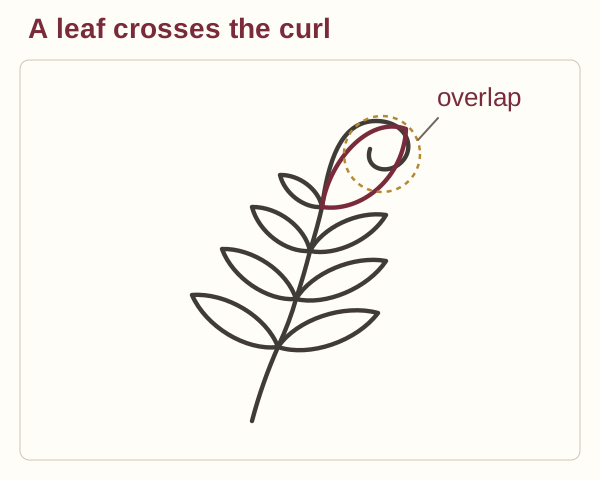
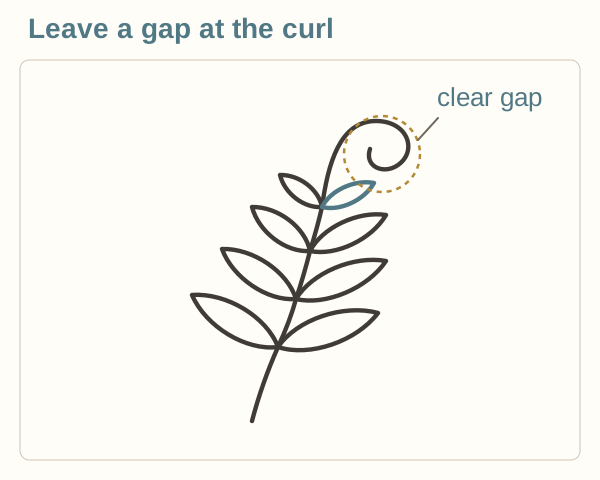
Shorten the upper pair. Leave a visible paper gap between the leaf tips and the curled stem.
Daisy Dot
Eight long petals gather around one clear, round flower center.
The finished drawing. Watch it once, then try one step at a time.
Let’s draw it together.
Give it a place.Use this little flower for a single bright moment in your list.
If the line wandersStart every petal at the center edge and leave each neighboring petal a narrow gap.
Tulip Date Accent
A cupped tulip opens above two long leaves that rise from its stem.
The finished drawing. Watch it once, then try one step at a time.
Let’s draw it together.
Give it a place.Place the flower beside the date of a spring entry.
If the line wandersKeep the bloom narrower than the spread of the leaves so it feels supported.
Clover Check
Four heart-shaped clover leaves sit beside a clear, separate completion check.
The finished drawing. Watch it once, then try one step at a time.
Let’s draw it together.
Give it a place.Mark a finished task that came with a little good luck.
If the line wandersKeep the four leaf bases around a small open center, then give the check its own space.
Berry Cluster
Three round berries hang from a forked twig beside two pointed leaves.
The finished drawing. Watch it once, then try one step at a time.
Let’s draw it together.
Give it a place.Tuck it next to a market list, a recipe, or a winter memory.
If the line wandersDraw each little fruit stalk to the berry edge, never through its center.
Lavender Stem
A narrow lavender spike holds three floret pairs above two slender leaves.
The finished drawing. Watch it once, then try one step at a time.
Let’s draw it together.
Give it a place.Use the stem beside an evening reflection or a sleep note.
If the line wandersLet a little stem show between the floret pairs and keep the bottom leaves long and narrow.
Mushroom Note Mark
A domed mushroom cap shades a gently widening stalk and a few open gills.
The finished drawing. Watch it once, then try one step at a time.
Let’s draw it together.
Give it a place.Draw it beside a field observation and write the location nearby.
If the line wandersLeave clear paper around each short gill, and stop the gills before the stalk.
Saguaro Continue Mark
An upright saguaro spreads two rounded arms above a small desert mound.
The finished drawing. Watch it once, then try one step at a time.
Let’s draw it together.
Give it a place.Set the cactus beside the next step in a paused project.
If the line wandersGive the elbows roomy curves, and stop the inner ribs before the rounded tips.
Acorn-and-Leaf Accent
A round-capped acorn rests beside a lobed oak leaf on a curved stalk.
The finished drawing. Watch it once, then try one step at a time.
Let’s draw it together.
Give it a place.Finish an autumn heading or add it beside a woodland memory.
If the line wandersKeep a clear gap between the acorn and the leaf; the leaf lobes can be a little uneven.
Something for a future page?
The Washi Tape ShopAffiliate links: we may earn a commission if you buy through these links.
Where this idea began
All botanical geometry is original to Tiny Systems Co. Archer & Olive’s beginner-spread article informed the general principle of keeping page tools simple and adaptable. This guide does not reproduce its specific drawings and does not imply firsthand testing by Tiny Systems Co.
This guide grew from our original Instagram post. The examples and explanations here expand on that idea so you can try it at your own pace.
- Original Tiny Systems Co. postour original Instagram post
The original Tiny Systems Co. post establishes where this guide began. The expanded instructions, examples, and practice measurements are editorial additions unless separately credited.
Want to explore the techniques a little further? Here are the maker tutorials and references behind this guide.
- Creative contextArcher & Olive: Five of the Easiest Bullet Journal Spreads for Beginners
Simple beginner spreads provide context for adaptable tools; the botanical drawings here are original.