Gather a few things See what you’ll need
- A pen
- Your journal
- Two related entries or a note that continues elsewhere
Choose an exercise 3 things to try as you read
Find the two pieces before drawing the connection
Open the page where the note starts and the page where it resumes. If your journal doesn’t have printed page numbers, write a number on each page you’re linking, or use clear dates and headings that you can find again.
Suppose the first note ends on page 12 and resumes on page 18. Write “continued on p. 18” at the first end and “from p. 12” at the second. Do that while both pages are open. The curl you draw next will draw attention to directions that already work.
Decide whether you’re continuing or connecting
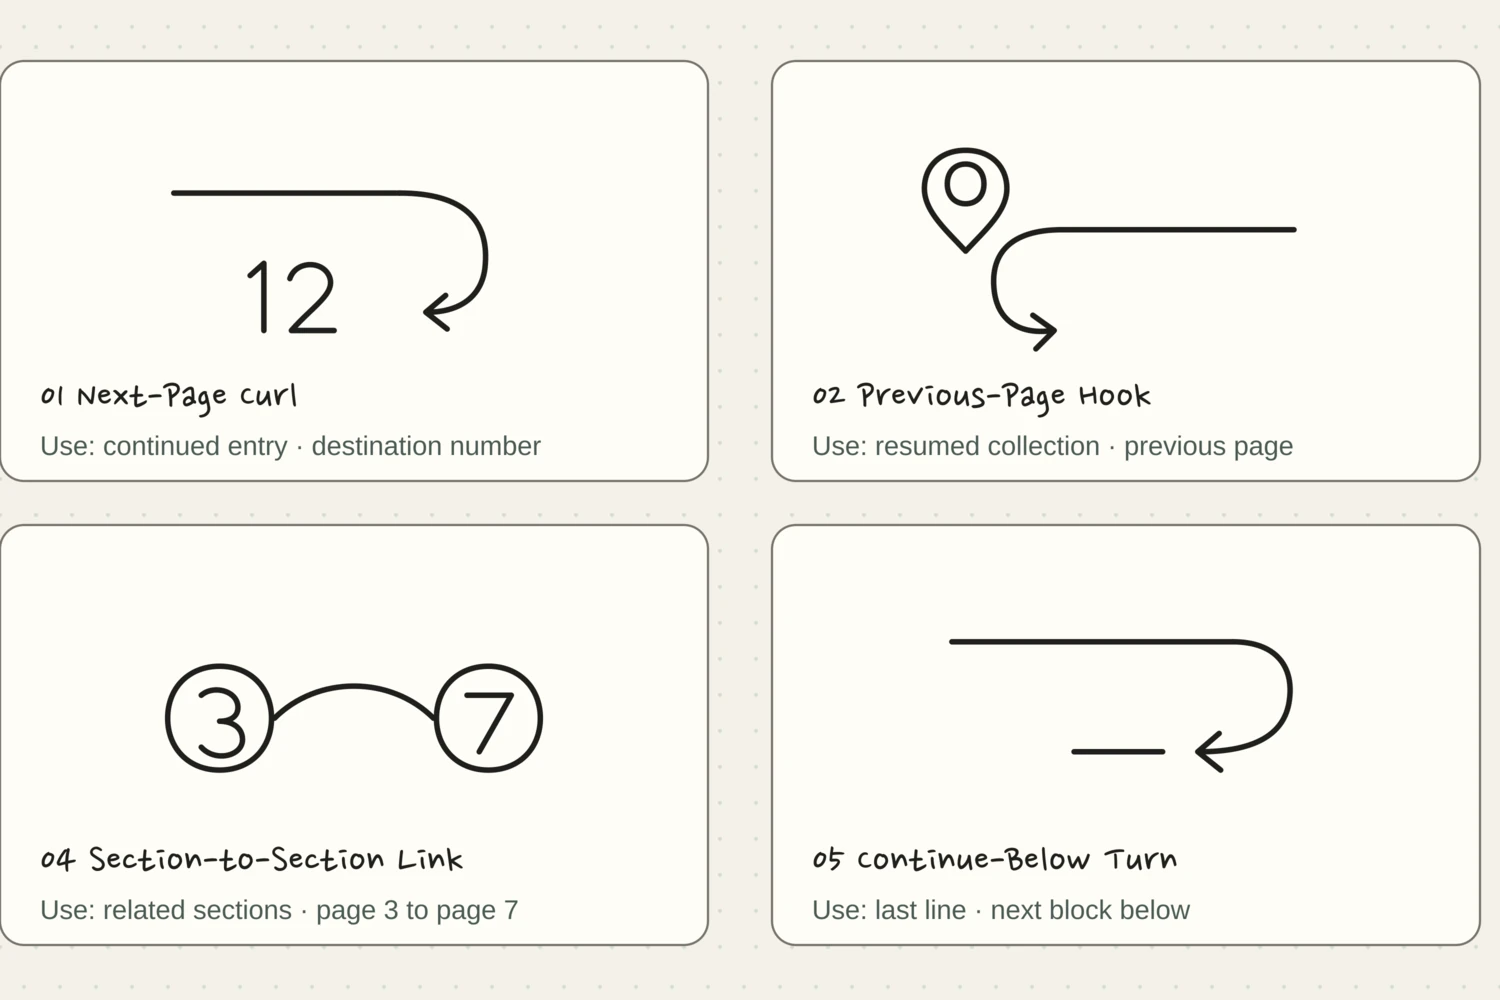
Sometimes the second page is literally the next part of a note. The Next-Page Curl and Previous-Page Hook suit that situation: one points onward, and the other tells you where you came from.
Other pages simply belong together. A question and its eventual answer, for example, or a plan and a later reflection. Try the Section-to-Section Link or Paired Entry Link for those. Keep both destinations in writing. The shape can suggest a relationship, but you shouldn’t have to remember the entire story to follow it.
Compare the optionsWhat kind of connection are you leaving?
Let the arrow travel through empty paper
Use the drawing examples below to choose a cue, then press Draw it to watch its route. You can pause at the bend or step through the arrowhead slowly. Practice at a generous size first, keeping a visible gap between the point and the destination number.
On your actual page, take the shortest clear route through the margin. If an arrow would cross a sentence, move the cue to the entry’s end instead. A number with a small arrow beside it is easier to follow than a long curve winding through several paragraphs.
Try the exampleKeep the route beside the words
You can connect two parts of one page too
Perhaps you’ve written a thought at the top and its answer in an open corner below. The Continue-Below Turn can guide your eye between them. A small margin pointer can connect a quotation to the source note you wrote nearby.
An arrow needs somewhere definite to arrive. If there are two notes in the lower corner, add “answer” or a short heading at its point. Making the arrow bigger tells you where to look, but it cannot tell you which of those two notes belongs to the question.
Think about how you’ll arrive here next time
You might find the later page first. That’s why the return reference matters as much as the forward one. Before closing the notebook, turn to each end and follow the written direction back. Correct a missing or wrong number while both entries are still fresh.
If you use an index, add the collection name and its page numbers there too. These drawings can make an existing index or collection easier to use. They don’t need to carry the entire organizing job on their own, especially once the notebook fills up.
Try a what-ifThe continuation crosses into a new notebook
GO A LITTLE FURTHERUse one familiar route again
Use one familiar route again
You may find you only need the forward curl and the backward hook from the twelve examples. That’s plenty. Repeating those two cues gives you a familiar direction to look for, while the changing number tells you where this particular note goes.
Leave the trail plain when you are writing quickly. A readable destination takes care of the next visit; a playful curve can wait. If you later add a third page, update the link at the end of the second one so the route follows the thought as it grows.
Pick a drawing and follow along
Choose a drawing below. Watch the whole shape appear, or tap a numbered step to see just that part. The faint outline is there if you’d like a little guidance.
Pick a drawing. We’ll take it one stroke at a time.
Next-Page Curl
The last entry line sends one broad curl down toward page 12. The arrow stops short of the destination, so the number stays readable. Tiny Systems Co. original pen route.
The finished drawing. Watch it once, then try one step at a time.
Let’s draw it together.
Give it a place.End a continued entry with this curl and replace 12 with the page where you continue.
If the line wandersWrite the destination first. If it crowds the arrow, shorten the return stroke.
Previous-Page Hook
A resumed entry hooks upward and back toward page 8. The backward turn identifies the earlier page. Tiny Systems Co. original pen route.
The finished drawing. Watch it once, then try one step at a time.
Let’s draw it together.
Give it a place.Place it beside the first resumed line and replace 8 with the page you came from.
If the line wandersKeep the hook above the resumed writing. Its arrow should stop just before the old page number.
Return-to-Index Mark
A return arrow leaves an entry and curves toward a small house containing one index dot. The home outline gives the route a clear destination. Tiny Systems Co. original pen route.
The finished drawing. Watch it once, then try one step at a time.
Let’s draw it together.
Give it a place.Add it at the end of a long collection when your next stop is the master index.
If the line wandersAim toward the house without touching its roof. Make the curve wider if the arrowhead crowds the outline.
Section-to-Section Link
Two roomy page seals share one high, relaxed bridge. With no arrowhead, the link connects pages 3 and 7 without setting a reading order. Tiny Systems Co. original pen route.
The finished drawing. Watch it once, then try one step at a time.
Let’s draw it together.
Give it a place.Use it for related sections, replacing 3 and 7 with their page numbers.
If the line wandersRaise the bridge if it feels cramped. Keep the numbers centered inside their own seals.
Continue-Below Turn
A route bends outside the last writing line and points to a shorter receiving line below. Neither line is crossed. Tiny Systems Co. original pen route.
The finished drawing. Watch it once, then try one step at a time.
Let’s draw it together.
Give it a place.Use it when a note continues in another block lower on the same page.
If the line wandersMove the bend farther into the margin if it crowds the writing. Keep a gap before the receiving line.
Margin Locator
An open pointer identifies one quoted line at the margin; page 24 names its source note. The page number and quote remain clearly separate. Tiny Systems Co. original pen route.
The finished drawing. Watch it once, then try one step at a time.
Let’s draw it together.
Give it a place.Place the pointer beside a quotation and replace 24 with the page holding the full source note.
If the line wandersCenter the pointer on the quoted line before writing the number. Keep a small gap on both sides of the margin.
Two-Page Thread
Two page rings meet a roomy central oval through separate, gently bending threads. The shared knot records a relationship without a reading order. Tiny Systems Co. original pen route.
The finished drawing. Watch it once, then try one step at a time.
Let’s draw it together.
Give it a place.Use it in an index beside two pages belonging to the same topic; replace the example page labels.
If the line wandersMeet the central oval at its side points. Do not run either thread through its open center.
Paired Entry Link
Two small note nodes exchange separate curved arrows. One route travels from the upper note to the lower one; the other returns through the open space beneath. Tiny Systems Co. original pen route.
The finished drawing. Watch it once, then try one step at a time.
Let’s draw it together.
Give it a place.Pair a question with its answer, or a plan with its result.
If the line wandersKeep both arrow tips just outside their receiving nodes. The two routes should never cross.
Loop-Back Reminder
A broad open loop returns toward a stable dashboard seal. One center dot identifies the destination, while the open arrow shows the recurring visit. Tiny Systems Co. original pen route.
The finished drawing. Watch it once, then try one step at a time.
Let’s draw it together.
Give it a place.Use it beside an item that regularly returns to a monthly dashboard or recurring log.
If the line wandersKeep the large loop open and its arrow outside the seal. Do not retrace the circle to add emphasis.
Top-to-Bottom Anchor
A small origin ring beside a heading starts a clean downward route. The arrow stops before a separate footnote rail. Tiny Systems Co. original pen route.
The finished drawing. Watch it once, then try one step at a time.
Let’s draw it together.
Give it a place.Put the origin beside a heading and lead to a correction or source note at the foot of the page.
If the line wandersKeep a short gap below the origin and a larger one before the footnote rail. The route should remain straight.
Three-Tab Section Stack
Three open section tabs share one clean border. The taller center tab and its short inner rail mark the active section. Tiny Systems Co. original pen route.
The finished drawing. Watch it once, then try one step at a time.
Let’s draw it together.
Give it a place.Use it on a section opener. Raise and mark whichever of the three tabs is active.
If the line wandersMake the active tab taller before adding darker lines. Keep the two dividers straight and separate.
Chapter Trail
Exactly three open trail dots lead to a small notched continuation flag. The rhythm points ahead without adding another arrow. Tiny Systems Co. original pen route.
The finished drawing. Watch it once, then try one step at a time.
Let’s draw it together.
Give it a place.Place it after a reading or study note when the chapter continues on the next page.
If the line wandersSpace the three dots evenly first. Leave a wider pause before the flag so its notch stays readable.
Something for a future page?
The Washi Tape ShopAffiliate links: we may earn a commission if you buy through these links.
Where this idea began
The official Bullet Journal Method describes an index and collections as core ways to organize and find content. The twelve animated cues here are optional, original Tiny Systems Co. navigation accents that can sit beside those structures; they are not official Bullet Journal symbols and do not replace page numbers or index entries.
Want to explore the techniques a little further? Here are the maker tutorials and references behind this guide.
- Method referenceBullet Journal: What Is the Bullet Journal Method?
Official overview of logs, collections, indexing, and review; original decorative cues are separate.
- Website implementationW3C: Pause, Stop, Hide for moving content
W3C guidance informs animation pause controls, not the craft or writing method.
- Website implementationMDN: SVG stroke-dashoffset
SVG stroke-dashoffset documentation explains the on-page stroke animation, not a drawing method.