Gather a few things See what you’ll need
- A 28 × 10 cm paper strip
- Pencil
- Ruler
- A pen
- Thin paper scraps and glue stick
Choose a sequence before making pages
Pick four moments with a reason to sit together: leaving home, arriving, noticing something, and coming back. They don't need equal importance. The panels simply give you a manageable number of places to begin. Write those four labels on a loose note so you can change them before decorating.
The example uses a 28 × 10 cm strip, which becomes four 7 × 10 cm panels. Cut the long sides as straight as you comfortably can. A very long strip magnifies small errors; this small version is easier to align and can remain a separate booklet inside your journal storage.
Use matching edges to place the creases
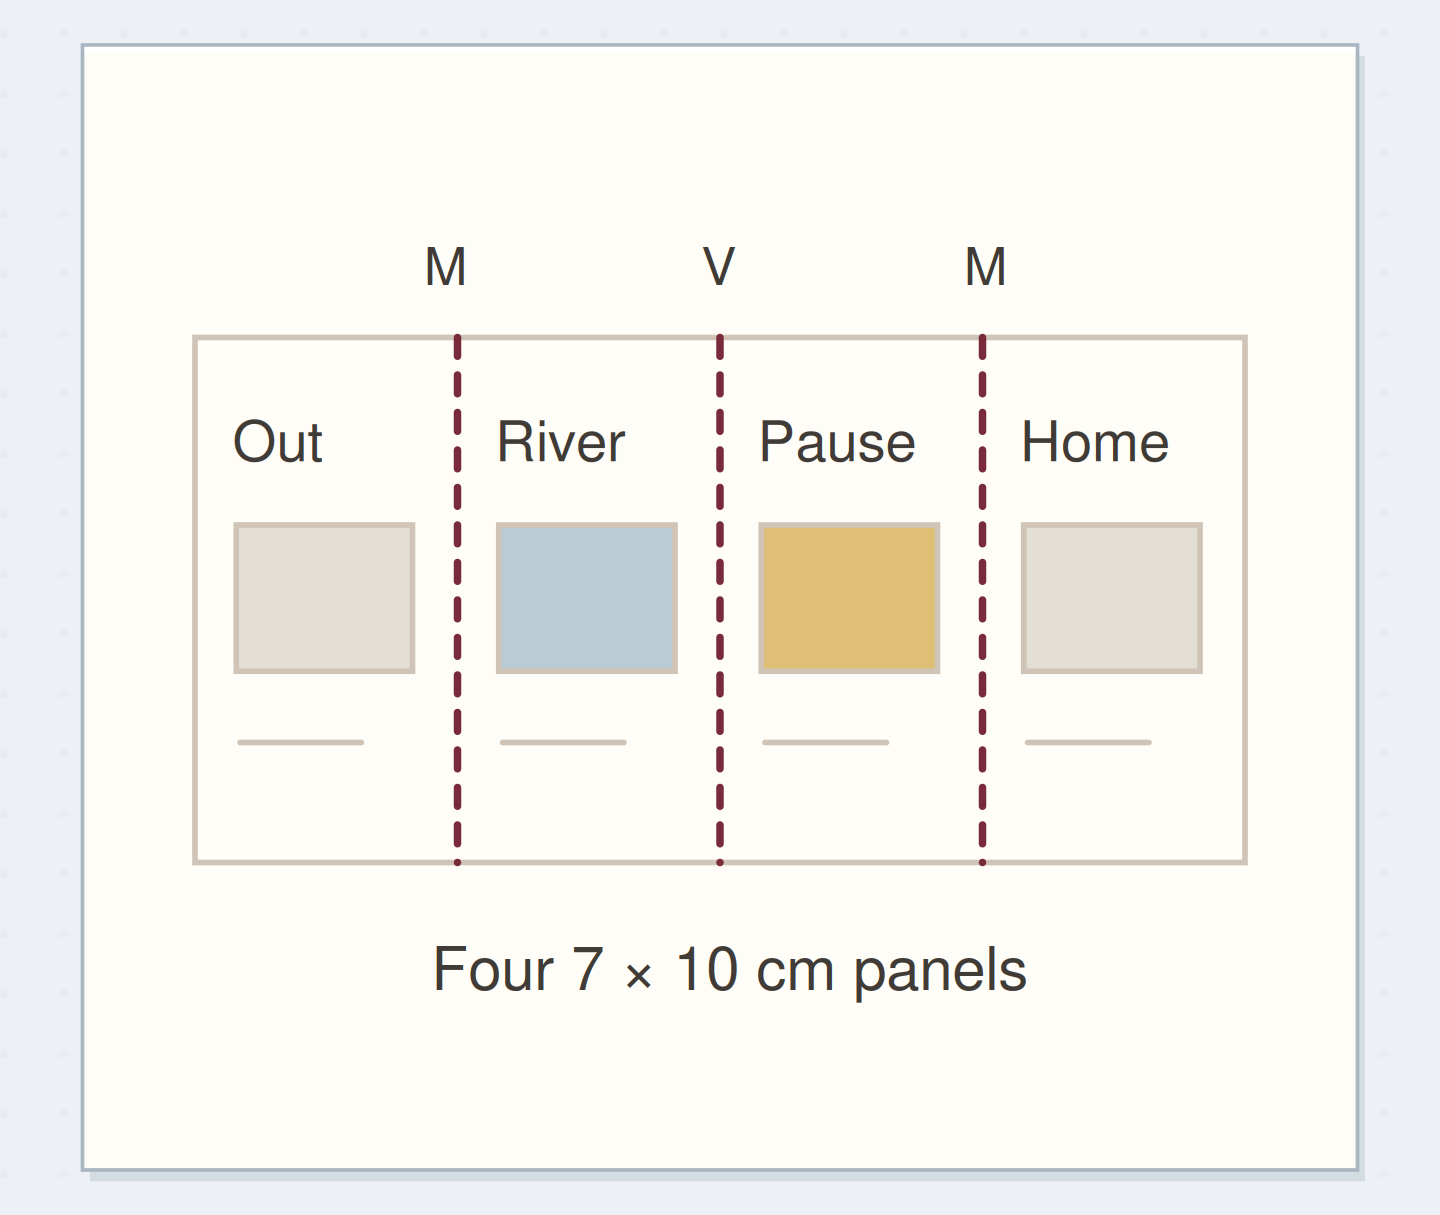
Fold the strip in half across its length, bringing the two short ends together. Align the corners before pressing the fold. Open it slightly into a V. Fold one free end back toward the central fold, then repeat with the other end, creating a four-panel zigzag.
Viewed from the side, the alternating folds form an M or W depending on which way you hold it. Don't flatten all three creases in the same direction. Open the strip fully and check that it has four equal panels. Lightly label them on the intended front face before adding any permanent words.
Fold a Small Accordion for a Story With Several Stops
Trace a flat strip through the folds into four places for a short sequence.
One 28 × 10 cm strip supplies all four panels.
A 28 by 10 cm strip before folding. Use the article measurements for the physical version; the drawing is a schematic.
“The booklet is finished when the folded object and the open sequence both make sense.”
Leave a small breathing space beside each fold
Keep captions and image edges a few millimeters away from each crease. The paper needs to bend there, and a thick scrap crossing the fold can resist that movement. Write on the flat strip, but remember that readers will also see the booklet partially closed, one panel at a time.
Choose thin additions that remain within individual panels. A single small image and two handwritten lines per panel are plenty for this scale. If you want a continuous line running across the whole strip, draw it in pen; a drawn connection adds much less stiffness than a glued band of paper.
Order the steps: fold the strip first
Check the physical dependencies in this accordion book example. Reorder the actions before trying the paper version.
One workable order
- Fold the stripThe folds establish the four panels.
- Check the opening directionChecking the opening direction prevents a reversed story.
- Write the four momentsWords can be placed once the panel order is known.
- Add thin scrapsThin scraps can be added after the panel order has been checked.
Which check needs to come first?
The example shows one workable order. Thin scraps can be added after the panel order has been checked.
Four panels from a Saturday walk
Label the first panel “Out” and write, “We left after the rain stopped.” On the second, “Along the river,” add a narrow blue scrap. On the third, “The pause,” record the warm bench where you ate an apple. On the fourth, “Home,” write the thing you noticed on the way back.
Add the date on the reverse of the first panel, which can become the outside cover when the accordion is folded. Open and close the strip while deciding the title placement. A title that looks correct on the flat sheet can end up on an inner face if you don't check the folded object.
Plan first moment
Draft the first moment and the pause you most want the four-panel sequence to preserve.
First moment:We left after the rain stopped.
Pause worth keeping:The bench was still warm in the sun.
Your words have a place now.
Draft the first moment and the pause you most want the four-panel sequence to preserve.
- Words on this card
- 19
Rescue a wandering accordion
If the ends don't align, unfold the strip and compare panel widths before cutting anything. A crease in the wrong place is better corrected while the paper is still undecorated. Refold against matching edges and accept a faint old line as part of the practice piece.
If the panels are usable but the top edge is slightly uneven, leave it alone or trim the closed stack very lightly with scissors. Don't trim close to a caption or cut through the folded spine edges. If one panel is noticeably narrower, let it serve as the cover rather than forcing every panel to match.
Read the panel map
Open the strip fully and read the four numbered front panels from beginning to end.
Strip
The unmarked strip has no visible panel boundaries yet.
Keep the opening route available
You can leave the accordion loose in a larger envelope or hold it under an existing removable band. Try the full opening movement before choosing where it lives. A pocket that hides every edge makes the little book harder to find; a visible corner or a written index note gives it a clear home.
If you attach the final outside panel to a journal page, the other panels must remain free to unfold. Check the entire sweep beside the binding and keep glue on that fixed panel only. This attachment is optional; the accordion is already complete as a small independent book.
Read it once in both forms
The booklet is finished when the folded object and the open sequence both make sense. Read the front, open one panel, then extend the whole strip. Check that captions are upright, folds move freely, and no image catches on a neighboring edge.
Stop after the four moments are recorded. You don't need to fill every reverse face immediately. Another day can use a longer strip, but length isn't the only way to add interest: a different panel size, a repeated line, or one carefully chosen image may be enough to make the next accordion feel entirely different.
Where this idea began
Want to follow the idea further? These community discussions and maker references are a good place to start.
- Help with accordion books
A beginner asks how to prevent uneven accordion folds and misaligned page edges.
- The Carle: How to Make an Accordion Book
The museum demonstrates halving a strip and folding the two ends back to create an accordion.