Gather a few things See what you’ll need
- Two colored pencils
- Pencil sharpener
- Paper
- Pencil and ruler
Choose colors with a visible relationship
Pick a yellow and a blue, or another pair whose overlap you want to explore. Use the same paper throughout and sharpen the pencils enough to make small controlled marks. Carrie L. Lewis's layering tutorial explains that pressure, point, and surface change a layer's result. The community layering discussion also distinguishes thin repeated applications from simply pressing harder. Keep those ideas separate in your test: first compare order with light pressure, then compare a heavier finish. Otherwise you won't know which change produced the difference you prefer.
Separate order from pressure
Reverse the colors before changing the finishing pressure.
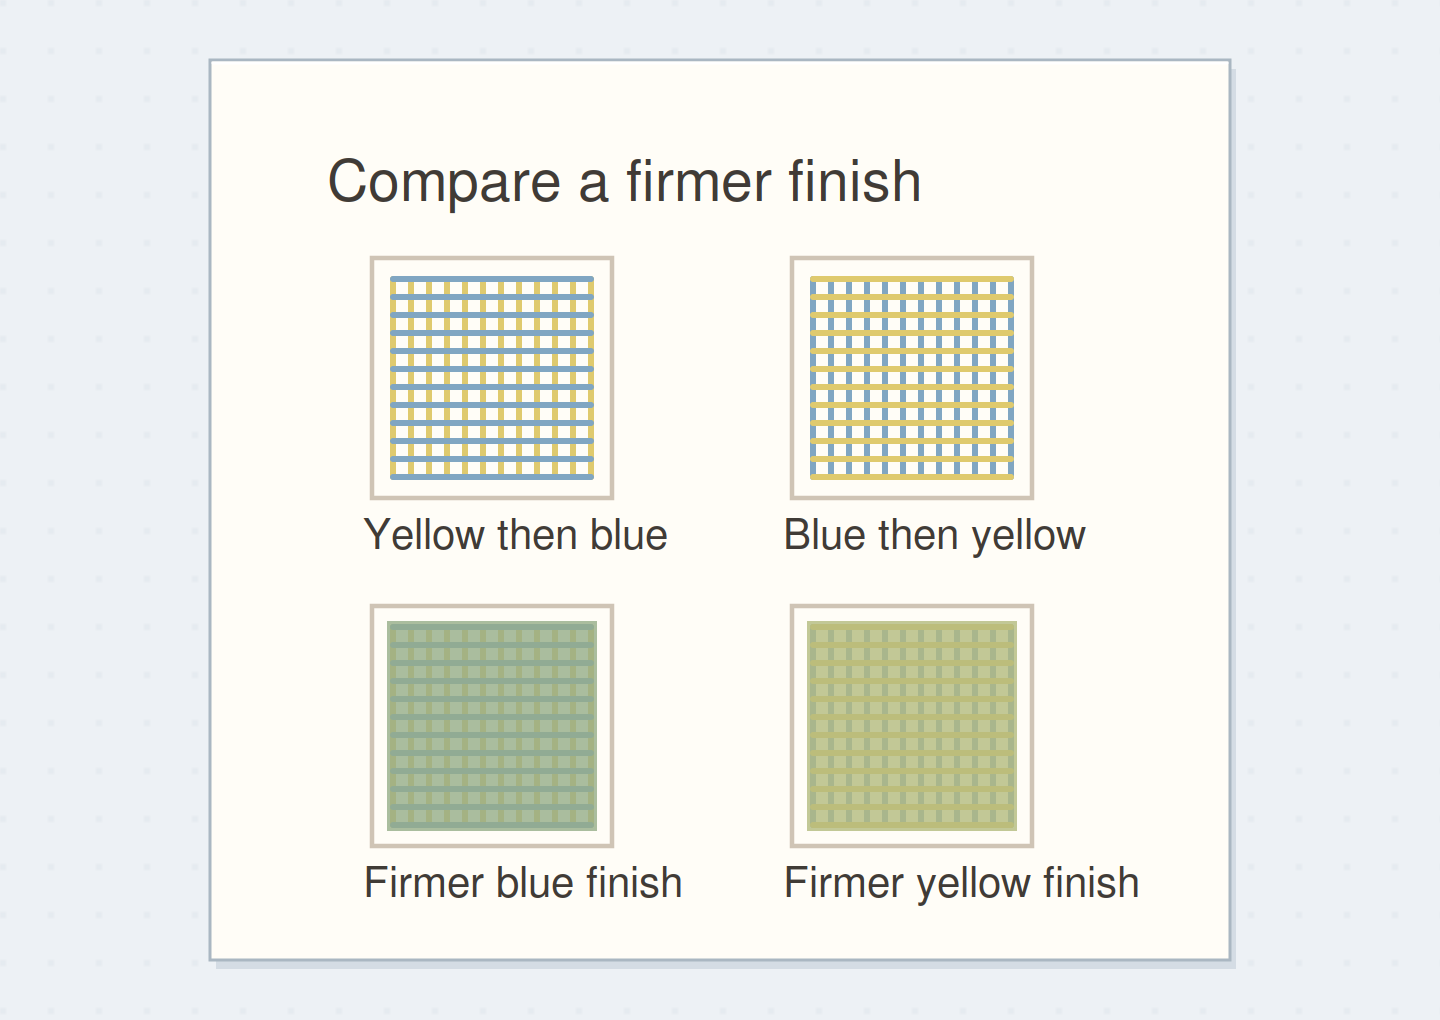
Four squares begin with matching light first layers in the two orders
The left pair begins yellow and the right pair blue; all four first layers stay light.
Reserve four matching swatches
Draw four 20 mm squares in a two-by-two grid with enough space for short labels. Label the top row “yellow then blue” and “blue then yellow.” Give the bottom row the same labels with “firmer finish” added. Make all four first layers with light, overlapping marks. Leave some paper texture visible instead of forcing immediate solid coverage. The two bottom swatches should begin just like their top partners. This setup gives you a direct comparison rather than four unrelated attempts made with increasingly different pressure.
“Stop when you can name one combination of order and pressure that gives the texture you want.”
Add the second color lightly
Add blue over the yellow-first squares and yellow over the blue-first squares. Use a similar number of light passes and keep the pencil movement small enough to stay within each square. Turn the paper if that helps your marks cover a different direction evenly. Compare the top pair before adding anything else. Depending on the pencils and paper, the difference may be strong, subtle, or hardly visible. Record what happens rather than insisting the first color must always dominate or that the second must completely cover it.
Keep the first comparison light
Move the reveal control to inspect this specific change.
Dense first layers
Both order and pressure changed, so the comparison is unclear.
Compare a firmer last pass
On the bottom-left square, make a firmer final pass with blue; on the bottom-right, use yellow. Keep the top pair untouched. A dense final application may reduce visible paper texture and change the color, but it can also leave less room for later adjustments. Heavy-pressure burnishing is a distinct finishing choice described in primary pencil tutorials, not a requirement for every layered drawing. Stop if the surface becomes slick or the pencil stops depositing useful color. The test should show a difference without requiring you to damage the paper.
Choose a recipe for a small tab shape
Draw a 30 mm by 15 mm tab-shaped patch on a fresh area, using the top-row recipe you prefer. For this example, choose yellow first and a light blue layer afterward, leaving a slightly paler strip along the top. Keep the same pencil pressure you used in the successful swatch. Add a short dark label beside the patch rather than over an uncertain dense surface. The tab is a color accent drawn on paper; it doesn't need to be a physical attachment for the layering comparison to have a useful destination.
Write your layering recipe
Your paper and pencils may show a subtle difference; record that honestly.
Pencil pair:Yellow and blue on this paper
Recipe selected:Yellow first, then a light blue layer
Your words have a place now.
Your paper and pencils may show a subtle difference; record that honestly.
- Words on this card
- 17
Keep a heavy first layer from setting the whole plan
If your first layer is already very dense, don't keep adding pressure to make the second show. Leave that square as a heavy-base comparison and restart nearby with a lighter application. If two colors make an unwanted grayish mixture, test a different pair in fresh cells instead of burying it under several more colors. An eraser may lift some pencil on some papers, but test it separately before relying on it. You can keep the unsuccessful sample with a short note; it is evidence about a process, not a page that needs hiding.
Before changing finish pressure
Order the preparation before the operation that needs its result.
One workable order
- Label both layer ordersOrder labels preserve which first color belongs in each paired cell.
- Apply matching light first layersEach second color is applied over its corresponding first layer.
- Add the reversed second colorsInspect that light comparison before pressure becomes another changed variable.
- Compare before a firmer finishStop when you can name one combination of order and pressure that gives the texture you want.
Which check needs to come first?
The example shows one workable order. Your paper and pencils may show a subtle difference; record that honestly.
Save a visible recipe and stop
Stop when you can name one combination of order and pressure that gives the texture you want. Label it using both color names and “light layers” or “firmer finish.” Counted passes can help reproduce a local experiment, but don't treat the number as a universal prescription for every pencil. Keep the four swatches together so the comparisons remain available. On a later drawing, make a small matching test if you change paper. A deliberate light layer is useful because it leaves choices open, even when a dense finished surface is eventually your goal.
Where this idea began
Want to follow the idea further? These community discussions and maker references are a good place to start.
- I see mentions of layering here - can you please elaborate?
The opened discussion distinguishes thin repeated pencil applications from heavier blending and asks how layering works.
- Layering Basics for Colored Pencil Artists
Explains how pencil point, application pressure, and paper affect layered color.
- Color Blending Tips
Describes burnishing as a heavier-pressure layered finishing technique; no solvent recommendations are used.